
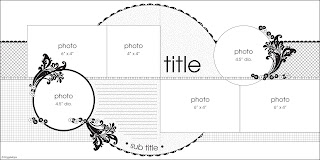
Kristi, guest designer for March, using the Bigger than a Breadbox kit, brings you your first "working" peek at the March kits. She's also bringing you your second challenge - like the beginnings to a great party start with a twinkle of inspiration, so too, does a sketch give your next layout that positive push - use the March sketch below. Thanks Kristi, not only for the great layout, but for the challenge. :) See more of Kristi's great work on her blog HERE.
Do you ever see a sketch and wonder, "Just how am I going to make my layout look like that?" I used to think this all the time when I was new to sketches and found myself intimidated sometimes by a technique or unusual cut. Now, I am not intimidated, but often still think, "How am I going to do that?"
For example: This sketch for March has a giant circle in the center. Well, I don't know about you, but I don't have a circle cutter that big so I knew I was going to my kitchen to get a plate or a lid to a pan.
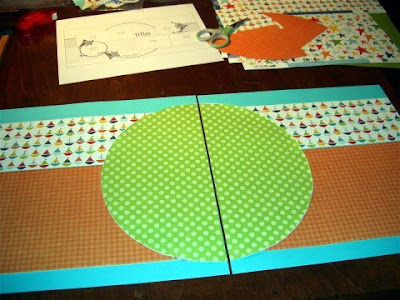
The first thing I did was place the lid on top of the patterned paper that I wanted to use and then holding down very firm I went around the paper with my exacto knife. After cutting out the paper I placed in on the cardstock where I wanted it for the next step.
 The reason for this next step is not only to reduce the bulkiness of the page, but also to stretch out that paper (i.e. money) as far as I could.
Then just glue it all down. And voila! You have a giant circle like the sketch.
Here is my final layout. Interpreting a sketch is always the fun part I think. When I first saw the sketch I knew that I wanted to sew my scallops around the circle, but if you don't have a sewing machine or haven't tried this yet: cut out little circles and then cut in half to make your own scallops.

 *Letters are Doodlebug Simply Sweet and Carolees Tiny Etched and Tiny Retro, both available in the Apron Strings Pantry.
Do you ever see a sketch and wonder, "Just how am I going to make my layout look like that?" I used to think this all the time when I was new to sketches and found myself intimidated sometimes by a technique or unusual cut. Now, I am not intimidated, but often still think, "How am I going to do that?"
For example: This sketch for March has a giant circle in the center. Well, I don't know about you, but I don't have a circle cutter that big so I knew I was going to my kitchen to get a plate or a lid to a pan.

The first thing I did was place the lid on top of the patterned paper that I wanted to use and then holding down very firm I went around the paper with my exacto knife. After cutting out the paper I placed in on the cardstock where I wanted it for the next step.

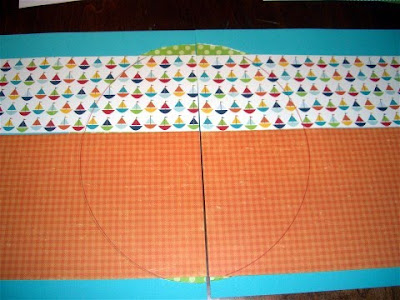
I placed the patterned paper that was going to go 'under' the circle on top of it temporarily. Then I used a pen to trace just to the inside of where the circle paper was (see picture). This way I can glue my circle down and then slide the rest of the patterned paper underneath - thereby, reducing bulk and saving paper that you would not be able to see anyway.

Then just glue it all down. And voila! You have a giant circle like the sketch.

Here is my final layout. Interpreting a sketch is always the fun part I think. When I first saw the sketch I knew that I wanted to sew my scallops around the circle, but if you don't have a sewing machine or haven't tried this yet: cut out little circles and then cut in half to make your own scallops.
One of the most fun things in this Bigger than a Breadbox kit for March is the KI Memories Scribbles because you can bend them around your shape!


Kristi Bergin-Smith
http://www.90percentkristi.blogspot.com/
6 comments:
Very cute layout!
Love all the color!
I LOVE the tip to curve the scribbles along the circle!
Here's my version on that wonderful PageMap!
"Snowy Daze!"
http://momentstocherish-deanna.blogspot.com/2011/03/snowy-daze.html
I love that colorful stitching! Great LO!
I added my LO to the linky.
I love this sketch and your circle tip. Your layout is so much fun. Thanks for the inspiration.
Post a Comment